
The GivingData Add-In for Microsoft Word should be installed on the computer for each user who will create document templates. You may need the assistance of your IT team to complete this installation.
Before starting the steps below, contact your Implementation Manager or Client Success Manager to obtain the manifest file that will be needed.
Microsoft Office 2016 or later is required to install this add-in.
Save the Manifest File
- Open the File Explorer.
- This can typically be accessed by clicking the file icon on the toolbar at the bottom of your screen. Alternatively, use the Search bar to search for it.

- This can typically be accessed by clicking the file icon on the toolbar at the bottom of your screen. Alternatively, use the Search bar to search for it.
- Click the This PC tab in the left-hand menu, and then click the C:drive.

- Right-click below the list of folders, click New, and then click Folder.

- Right-click the folder name, click Show more options, and then click Rename. Name the folder "GivingData Word Manifest."

- Open the new GivingData Word Manifest folder, and then drag and drop the manifest (.xml file) provided by your GivingData contact into the folder.

- Right-click the empty space within the folder and click Share or Give access to, and then click Specific people.

- Select your username, ensuring that it is highlighted in blue, and then click Share.

- Right-click the folder, and then click Copy to copy the full file path.
- The path will be in Universal Naming Convention format. UNC paths are written as the server or host name, prefaced by
\\, followed by the share name, and separated from the host name by\. UNC paths are used to access network resources. For example: \\example_host_name\GivingData Word Manifest.

- The path will be in Universal Naming Convention format. UNC paths are written as the server or host name, prefaced by
Load the Manifest in Microsoft Word
- Open a new Microsoft Word document, and then click File.

- Click Options.

- Click Trust Center, and then click Trust Center Settings.

- Click Trusted Add-In Catalogs.

- Paste the file path that you copied in the previous steps into the Catalog Url field. Check the box for Show in Menu, and then click OK.
- The Catalog Url will auto convert the path from
\\example_host_name\GivingData Word Manifesttofile://example_host_name/GivingData%20Word%20Manifest, to ensure the path follows a file path standard. This conversion is expected and necessary for the proper functioning of the add-in. You can proceed with the converted URL, as it will now correctly point to the manifest file in your local shared network location.

- The Catalog Url will auto convert the path from
- Close the document, exit out of Microsoft Word, and then open a new Microsoft Word document.
- Click Insert, click My Apps, and then click See All.
- Depending upon the version of Microsoft Word, you might need to instead click My Add-ins, and then click See All.

- Depending upon the version of Microsoft Word, you might need to instead click My Add-ins, and then click See All.
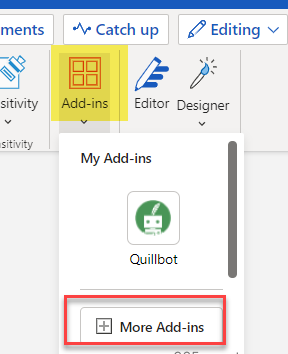
- Click Add-ins, and then click More Add-ins.
- Click Shared Folder, and then double-click the GivingData logo.

- The GivingData Add-In for Microsoft Word is now installed, and will appear in the header bar.
