
Integration Requirements
To ensure a smooth set up of the BILL Integration, please have access to the following personnel:
- Finance team or team members who will be processing payments
- Administrator for your BILL account
- Bill Account Manager/CSM for your BILL account
- Optional: Technical resource (IT Professional) to assist with the collection of the keys required to set up the BILL Integration
New to BILL?
If you do not currently have a BILL account, please reach out to your GivingData CSM. Your CSM will coordinate to have a BILL representative reach out to you to set up your account. Any paid BILL subscription is sufficient to utilize the GivingData BILL integration.
Integration Set Up Instructions
To set up the BILL Integration, you will need to provide your GivingData Implementation Manager or Client Success Manager with a few "keys" to use to configure the integration. Please see the below instructions on how to obtain the keys.
If you will only be using one BILL account, refer to the Standard Integration Authentication section. If you will be using multiple BILL accounts, refer to the Management Console Integration Authentication section.
Standard Integration Authentication
Step 1: Create a Sync Token and Sync Password
A Sync Token will be used by the integration to authenticate into your BILL Account through the GivingData BILL Integration. To create a Sync Token, the Administrator for your BILL account, or optionally your IT professional with access to your BILL account, will need to follow the below steps:
The Sync Token will be associated with the logged-in user. If you would like the Integration to be set up under a generic API BILL user account, you can create a new user in BILL, then login to BILL using that user login to set up the Sync Token.
User creation example:
First Name: API
Last Name: User
Email: <the email the API user will use to sign in>
Role: Administrator
- Login to your BILL account
- Click on “Settings” in the left navigation menu
- Under “Sync & Integrations”, select “Tokens”
- Use the “New” button to create a new Sync Token
- Give the token a name and copy it down
- Click “Save”
- On the next screen, your sync token’s password will be displayed. Copy the sync token password. This step is important because you won’t be able to view the password again.
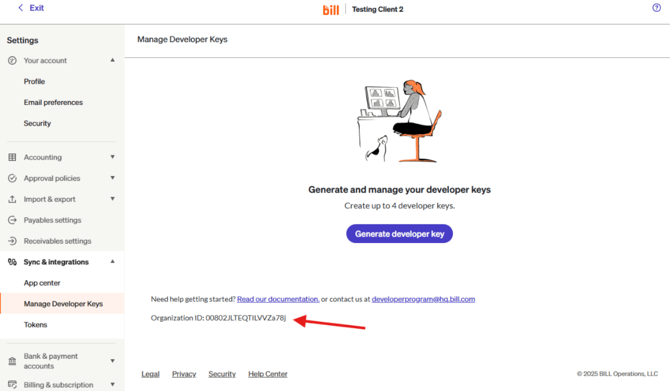
Step 2: Retrieve the Organization ID
- Login to your BILL Console Account
- Navigate to Settings
- Select “Sync & integrations”
- Select Manage Developer Keys
- Copy down the Organization ID at the bottom of the screen.

- Copy down the Organization ID at the bottom of the screen.
Step 3: Provide the Sync Token Name, Sync Token Password, and Organization ID to your GD Implementation Manager or CSM who will complete the integration set up.
Management Console Integration Authentication
Step 1: Retrieve a Console Admin’s Username and API Token
- Login to your BILL Console Account
- View your Staff list
- Select an admin user
- Select Manage Profile
- Then select Generate API Token (if you do not see this option, reach out to your Bill representative)
- Copy API Token to provide to your implementation manager/CSM.
- Copy down the admin user’s username (email) associated with their account.
Step 2: Retrieve the Organization ID and Name for each Client in your Console
- Login to your BILL Console Account
- Access the first Client in your console.
- Navigate to Settings
- Select “Sync & integrations”
- Select Manage Developer Keys
- Copy down the Organization ID at the bottom of the screen.
- Write down the name of the Client
Step 3: Provide the console Admin’s Username and Sync Token, and each client’s Organization ID and Name to your GD Implementation Manager or CSM who will complete the integration set up.