
Candid Demographic Data Integration
A new integration with Candid makes an organization's demographic data available in GivingData. This integration is enabled by default on your site, so please contact your CSM if you would like it to be disabled.
The Integration in GivingData
When the integration is enabled, a new "Demographics via Candid" tab appears on an organization record if the organization has a tax ID and a US address.
This tab is grayed out and disabled if the organization does not have a tax ID or a US address. A tooltip is also displayed explaining the situation.

On this tab, demographic data is continuously pulled from Candid and displayed. As soon as information changes in Candid, that new information also appears in GivingData.
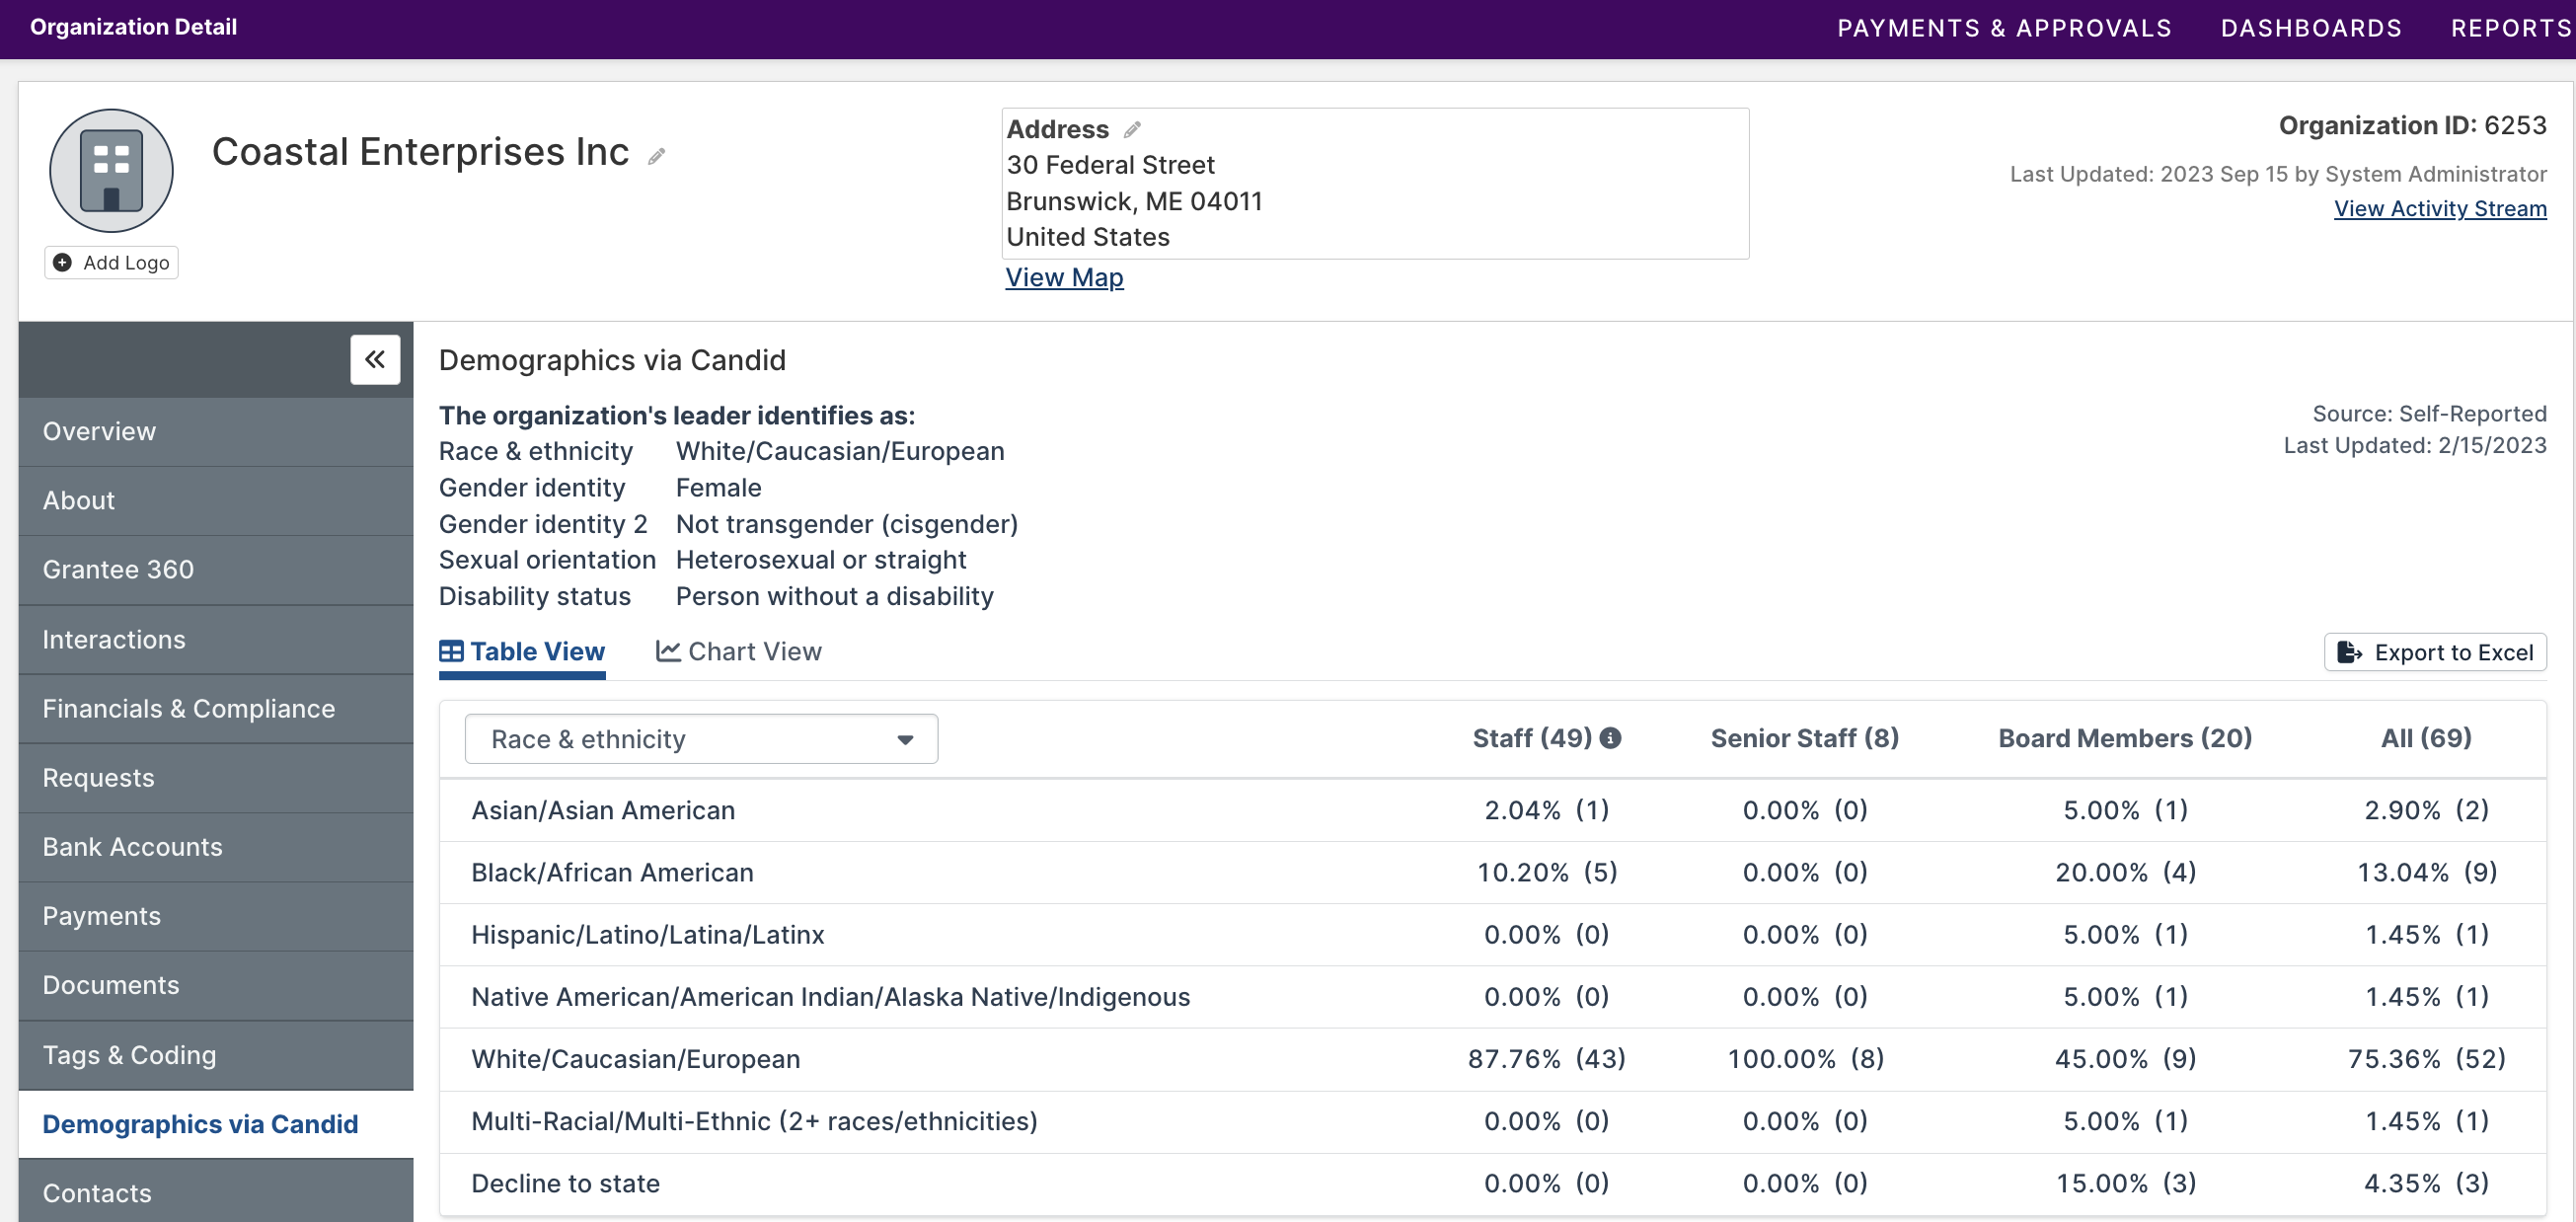
Data about the organization’s leader’s self-identification is located at the top of the page.
Below, users can select the type of data to view from a dropdown, and the data can be viewed in a table or in a bar chart.

Table View
In the table view, columns break down the data for different components of the organization’s staff and board members.
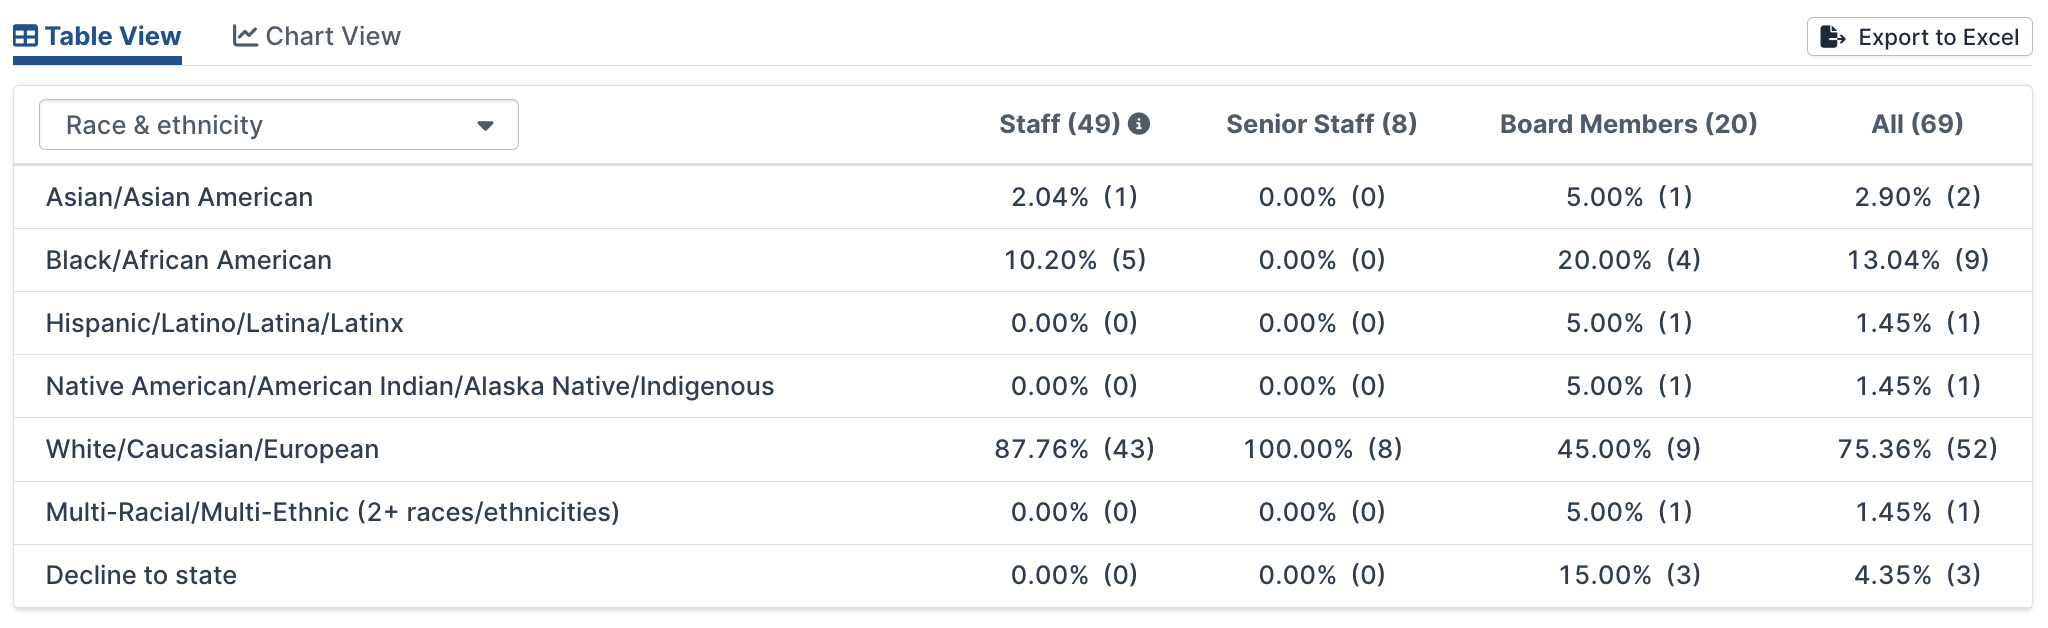
Note: Senior Staff is a subset of Staff. Therefore, the "All" column is a sum of the number of Staff and Board Members.
Users can export the table to Excel via a white button above the table.
![]()
Occasionally, the data pulled from Candid doesn’t add up correctly (or a portion of it is marked in Candid as Unknown), so GivingData includes an Unknown category when that is the case. This covers both situations described above.

In the top right-hand corner of the page, users can see the data source, which will always be “Self-reported” due to how Candid collects its data. The date when the data was last updated in Candid is also displayed here.

Chart View
The chart view displays the same data in a bar chart and allows users to filter based on type of staff or board members via a dropdown on the right-hand side of the page.


Users can also view the chart in full screen, print, or download it in a variety of formats by clicking on the three dots on the right side of the page and selecting their desired option in the dropdown.

The Integration in the Grantee Portal
In the Grantee Portal, there is a standard new field type option: Demographics via Candid. This option appears when the integration is enabled on a site.

Once this field is added, GivingData users can see the following, noting that the organization must have a tax ID in the intake entry to display demographic data from Candid. Therefore, a tax ID field must be added in the intake entry before the demographic data field.

From the Grantee Portal User's perspective, after they enter their Tax ID in the relevant field, the demographic data page/field will populate with the relevant Candid data.

Grantee Portal Users can also click “Edit Information on Candid” in the top right corner of the page to update their information in Candid.
The major difference between the GivingData view of the data and the data in the Grantee Portal is that only the table view is visible here, not the chart view. There is also no option to export the table to Excel in the Grantee Portal.
If the organization does not have a tax ID in the intake form, the Grantee Portal User will see the following in place of the demographic data:

Improvements
Clickable Dashboard Subtotals
Added the ability to click on subtotals in the Payments and Approvals Dashboards to open a list view of all payments or requests in that column. The subtotal in the Total column is also clickable and opens a list view displaying all payments or requests in the dashboard.
Improvements to Matching Organizations and Requests to Unsolicited Applications
These changes replace the first step users were prompted to do when opening the intake entry import modal for an unsolicited application. These entity assignment options are only available for unsolicited applications in In Progress and Submitted statuses.
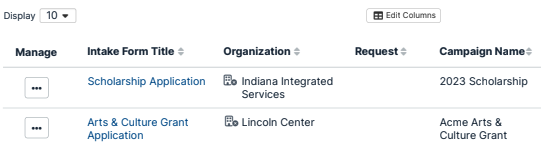
Grantee Portal Intake Forms Dashboard
A few changes appear on the Grantee Portal Intake Forms Dashboard itself. The dashboard view tabs have moved to their own row, directly above the bar chart. 
A new prompt button also now appears on the dashboard in the Submitted tab when there are unsolicited applications not assigned to organizations. The button displays a building with a small x and a number in a small blue circle. This number displays the number of unsolicited applications are not assigned to organizations. A tooltip also displays when a user hovers over the button, prompting users to assign the applications to organizations. Clicking the button opens the Assign to Organization or Assign to Organizations modal.

In the listview, a similar building icon (with an x in a circle) appears in the organization column when an application is not associated with an organization record. The name of the organization also remains in plain text (with no link) until the organization is created.
Manage Options
The Manage options for an unsolicited application on the dashboard have changed in several ways.
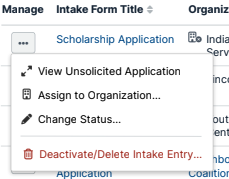
Now, a new option for “Assign to Organization” has been added and appears for In Progress or Submitted unsolicited applications that are not already associated with an organization record. This option replaces the former Import Files & Mapped Field Data option for unsolicited applications.
“Deactivate/Delete Intake Entry” has also been added to the menu of manage options and appears for all intake form types in all statuses. This option opens the same deactivate/delete modal that can be opened from the Grantee Portal tab of a Request record.
Once an In Progress or Submitted application is assigned to an organization, the “Assign to Organization” option in the manage menu changes to “Assign to a Request” until the application is assigned to a request. Clicking this option opens the Assign to Request modal.
The “Assign to a Different Request” option is included in the menu for unsolicited applications that are already assigned to a request.
The option to Assign to a Different Organization now also is displayed in the menu for In Progress and Submitted applications already assigned to organizations. Clicking it opens the Assign to Organization modal.
For unsolicited applications that are assigned to a request, the Import Files & Mapped Field Data menu item has been renamed to “Import Data” in the manage options menu. The Import Data option is displayed for intake entries in the Submitted and Partially Imported statuses.
Note: This option can also be renamed to "Import Data" for invited applications and other intake entry types.
Assign to Organization Modal
When assigning an organization to an application, the name of the organization submitted via the Grantee Portal, the application name, and the campaign name are displayed at the top of the modal. Once the unsolicited application is assigned to an organization record in GivingData, the matched organization name is displayed instead of what was submitted in the Grantee Portal.

The left hand side of the modal contains information submitted in the application form, and the right hand side offers the ability to select the organization to assign to the application. Users can search for an organization by name, the EIN, or its AKA name. When searching, the Select Existing Organization menu displays similar suggested organizations.
If the tax ID entered in the application matches the tax ID of a single organization record in GivingData, the organization is automatically selected, but the selection is not saved yet. The automatic selection is indicated by the yellow highlight that appears on the tax ID and lightning bolt icon. A tooltip appears when hovering over the tax ID.

If more than one organization record in GivingData has a matching tax ID, no automatic selection is made. Instead, the organizations will be included in the Suggested Organizations list in the Select Existing Organization menu.

Users have the option of creating a new organization from this modal. To do so, click the green "Add New Organization" button which opens the "Add Organization" modal.

After adding or selecting an organization, users must click “Save Selection” to assign the organization. They also have the ability to deselect an organization. Once the selection has been saved, a green confirmation tab appears in the top right hand corner of the page confirming the selection. Then the user can click the “Next: Assign to Request” button.

If a user closes the Assign to Organization modal before saving the selected organization they selected, a Discharge Changes modal pops up. It prompts users to save the selection before they leave the modal, or to discard the selection before leaving. This modal does not appear for automatic organization matches made when there is a single tax ID match.

Assigning Multiple Organizations
To assign organizations to several applications in the same modal, users can click the prompt button in the dashboard.
This opens the Assign to Organizations modal. At the top of the modal, users can click through multiple applications with arrows or select one from the dropdown. The menu includes all Submitted unsolicited applications that are not associated with an organization.
The rest of the modal layout is the same as the single Assign to Organization modal.

Once the user clicks Save Selection, a green success message is displayed confirming the selection. Once a selected organization is saved, a green checkmark appears beside the unsolicited application in the dropdown menu to help users keep track of which applications have been associated with organizations.

As with the single Assign to Organization modal, if a user closes the Assign to Organizations modal before saving the selected organization they selected, a Discharge Changes modal pops up. It prompts users to save the selection before they leave the modal, or to discard the selection before leaving. This modal does not appear for automatic organization matches made when there is a single tax ID match.
Assign to Request Modal
After assigning the organization, users can click "Next: Assign to Request" at the bottom of the modal. This displays Assign to Request modal where users can select an existing request or create a new one. The method for selecting an existing request is similar to selecting an existing organization. Users can search for requests on the organization the application is assigned to, and can use request title, request ID, reference number, etc. as search terms. Five suggestions per disposition are shown in the dropdown, and the search portion is broken up into tabs for different dispositions to prevent excessive scrolling.

To add a new request, click the green "Add New Request" button. The modal that opens to add a request pulls in data from the campaign’s default request values and populated mapped fields in the application.

A notification appears in the modal if the application is still in progress, warning the user that they can’t advance to the import process at that point (but can complete the request assignment process).

Note: When a user creates a new request or a new organization through the entity matching process, this entity is automatically assigned to the application. In contrast, a user-selected entity needs to be explicitly assigned.
To associate the request with the application, click the green “Save Selection” button.

A success message is displayed when a selected request is saved. To move on to importing the application's data, click “Next: Import Data.”

Note: When a request selection is saved and the user clicks Assign to a Different Organization, a warning message is displayed on the Assign to Organization modal. It warns users that assigning the application to a different organization will remove it from the current request it is assigned to.
Notable Bug Fixes
- Fixed a font issue where text appeared italicized.
- Resolved an issue with Charity Status Verification providing outdated information.
Other Bug Fixes
- Fixed an issue with deleting a field from an intake form.
- Corrected a problem with submitting an intake form in certain situations.