
A new super search can be run at any time. If the super search is then saved, it can also be run again at a later time. The filters for a super search determine which results will be included when the search is run.
Default filters, columns, and column sort order can be configured for each super search type. This can save time by providing a starting point when running super searches. Edit Default List Views contains instructions.
Article Sections
Start a New Search
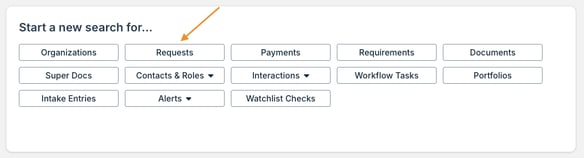
- Click the magnifying glass icon in the quick navigation menu.
- Click the record or item type for which you want to search.
- This dictates the record or item type of the search results. For example, a request super search will display request records as the search results.
- This dictates the record or item type of the search results. For example, a request super search will display request records as the search results.
- Refer to the section below for details on configuring search filters.
Configure Search Filters
The filters for a super search determine which data will be included in the results. There are four components to configure for search filters: the record or item type, a field, an operator, and a value.
- Select a record or item type from the dropdown.

- Select a field from the dropdown.
- Start typing the field name in the dropdown to search for it.
- Available fields depend upon the filter record or item type (e.g. organizations, contacts, etc.).

- Select an operator from the dropdown.
- Available operators depend upon the selected field.

- Available operators depend upon the selected field.
- Enter or select a value.
- The ability to type or select a value depends upon the selected field and operator.

- The ability to type or select a value depends upon the selected field and operator.
Additional options are available on the page to configure the search filters.
- Click Add Filter, and then select the type to add an additional filter to the search.

- Click the X icon to remove a filter from the search.
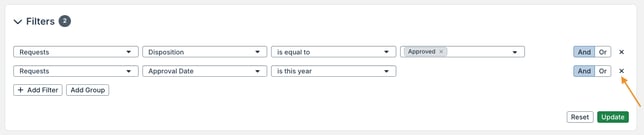
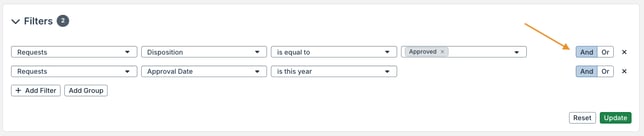
- Click the OR/AND operator to switch the operator between filters.
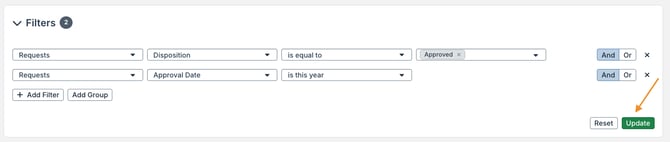
- Click Update to apply the filters to the super search.
One or more groups of filters can also be added. Filters within a group are considered together.
- Click Add Group to start a group of search filters.

- Click the OR/AND operator in the group to switch the operator between filters within the group.
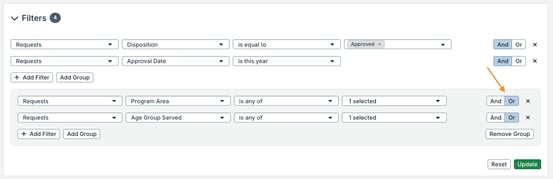
In the example below, the super search will look for requests with a status equal to Invited Application and with a program area of Education or age group served of Children.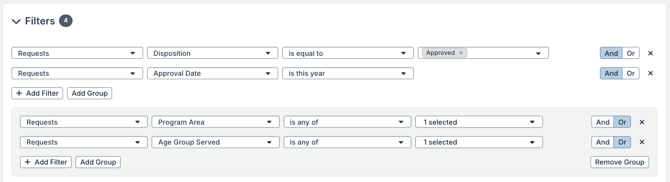
Super Search Options
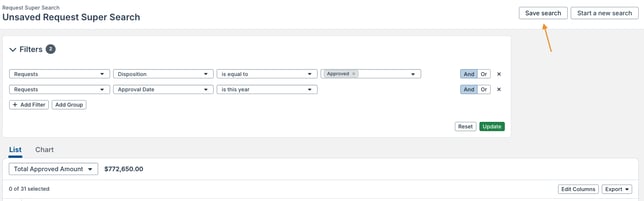
After running a super search, multiple options are available.
- Edit the columns of data included in the search results.
- For certain fields, perform in-line edits directly in the search results. The In-Line Edits section contains details.
- Click a column header to sort the list view in ascending order by that column. Click it again to sort in descending order.
-
- Press Shift on your keyboard and click one or more other column headers to sort by multiple columns.
-
- The sort field and order can also be adjusted by clicking Edit Columns.
- Columns that are sorted by date and timestamp are sorted down to the millisecond on the backend of the system. If two records have an identical date and timestamp down to the minute, the list will be ordered according to the millisecond.

- Click the vertical line next to a column and drag it to resize the column.

- Click a column header and drag and drop it into the desired location.
- A column can be placed on the far left side of the list view to pin it in place.

- A column can be placed on the far left side of the list view to pin it in place.
- For a request or payment super search, a Sum By calculation is available. Click the dropdown to select which field is summed across all requests in the search results.

- Click Export and then click either Excel or CSV to export the list view.

- Click Chart to access a visual display of the search results. Chart View contains details.

- Check the box for one or more records in the results to take actions in batch. Batch Edit from a Super Search contains details.

If you are using a Mac, the side scroll bar might be hidden by default. This can make it harder to see the option to scroll horizontally in super search results. Follow the steps below to adjust this setting on a Mac.
- Navigate to the Apple menu.
- Click System Settings.
- Click Appearance.
- Under Show scroll bars, select Always.
Changes to column order, width, and sorting are retained after navigating away from super search results. The system remembers these changes when rerunning a recent search from the Recently Run list (refer to the View Saved and Recently Run Searches article section for details).
In-Line Edits
Data in certain fields can be edited in-line, directly in the super search results.
In-line editing follows the same permissions as editing the field elsewhere in GivingData. If a user has permission to edit a field elsewhere in the site, they also have permission to edit it in-line in a super search.
Hover over a data point in the super search results, and then click the pencil icon to edit it.
- Press Enter on your keyboard to save the edits.

Only data points on the record type that was searched for can be edited in-line. For example, on a request super search, only data points on request records can be edited in-line.
The following data can be edited in-line in super search results:
- Organization Searches: AKA, Board Members, Background, Email, Full Time Staff, Intacct Vendor ID, Legal Name, Mission, Name, Notes, Part Time Staff, Vision, Volunteers, Website, Year Founded, Type, Tax ID, Compliance Notes, Vendor ID
- Request Searches: Docket Number, Project Title, Reference Number, Subdivision, Proposal Due Date, Meeting Date, Application Receipt Date, Track Expenditure Responsibility, Description, Notes, Website Description, Grant Fiscal Year, Publishing Notes, 990 Description, Website Title, Ready for Web, Regranting Enabled
- Payment Searches: Check Number, Confirmation Number, Invoice Number, Budget Fiscal Year, Schedule Date, Original Schedule Date, Invoice Date, Check Cleared Date, Nondeductible Amount, Alert Text, Notes
- Requirement Searches: Received Date, Description, Scheduled Date, Notes
- Interaction Searches: Title, Interaction Date, Interaction Start Time, Interaction End Time, Notes
- Contact Searches: Prefix, First Name, Middle Name, Last Name, Suffix, Salutation, Pronouns, Department, Title, Inactive, Notes
- Document Searches: Title, Notes
- Super Doc Searches: Title, Locked, Notes
- Task Searches: Name, Due Date, Status, Private
- Intake Entry Searches: Staff Notes
- Portfolio Searches: Name, Aspiration, Description, Start Date, End Date, Budget, Inactive
- Organization Alerts and Request Alerts Searches: Notes
- Organization Role and Request Role Searches: Conflict of Interest, Start Date, End Date, Notes
- Watchlist Check Searches: Notes
Save a Search
A new search can be saved, allowing it to be run again at another time. A search can be saved as private or public to all users in the site.
- While viewing the new search, click Save search.
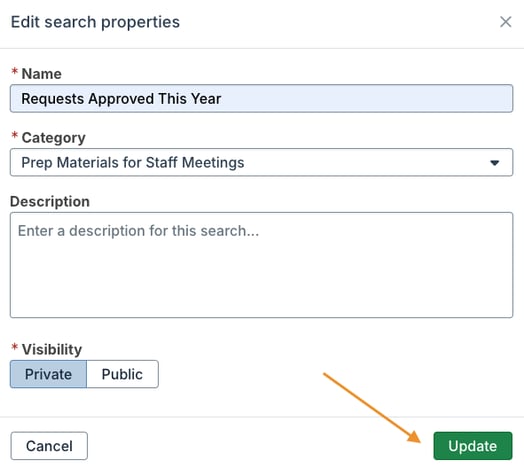
- Complete the applicable fields, and then click Update.
- Name - Enter a descriptive name for the search to help identify its purpose.
- Category - Select the search category. This super search will be grouped within the category when viewing a list of saved searches. The Search Settings section contains details on configuring the available categories.
- Description - Optionally add a description to further identify the purpose of the search.
- Save As - Select an option to configure who has access to this search.
- Private Search - Accessible only to you as the user creating the search.
- Public Search - Accessible to all users in the site. The user creating the search is automatically set as the search owner.
View Saved and Recently Run Searches
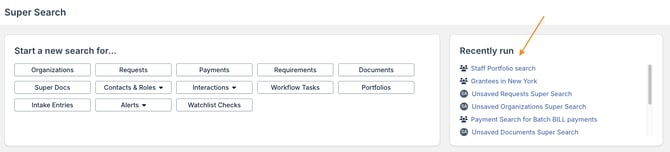
A list of your ten most recently run searches can be viewed. This includes both saved and unsaved searches.
- Click the magnifying glass icon in the quick navigation menu.
- Click a search name to run it again.
A full list of saved searches can also be viewed. This includes your private saved searches and any public saved searches. This list can be searched and filtered, allowing you to quickly locate a particular search to run again.
- Click the magnifying glass icon in the quick navigation menu.
Multiple options are available in the Saved searches section.
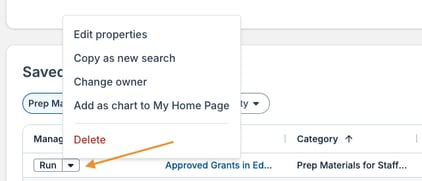
- Click Run to run the saved search.

- Click the dropdown icon to access other options.
- Click Edit properties to update the name, category, description, or visibility of the search. This option is only available to the search owner.
- Click Copy as new search to create a copy of the search which can then be saved.
- Click Change owner to change the owner of the search. The search owner can edit the properties, filters, and columns of the search, while other users must create a copy of the search to save these changes.
- Click Add as chart to My Home Page to add the chart view for the search as a widget on your home page.
- Click Delete to delete the saved search.
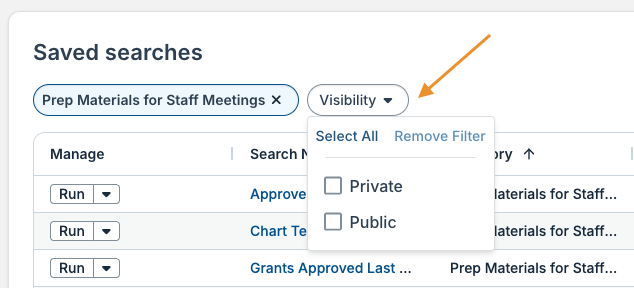
- Click Visibility and select an option to view only your private searches, only public searches, or both.
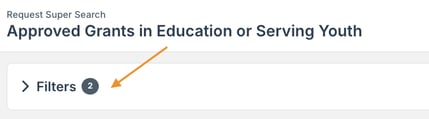
After running a saved search, several options are available.
- Click the Filters dropdown to update the search filters.
- Click Edit properties to update the name, category, description, or visibility of the search. This option is only available to the search owner.

- Click Save a copy to create a new copy of the search, without affecting the existing saved search.

Search Settings
The available categories for saved super searches can be managed in Admin Tools & Settings.
- Click the gear icon in the quick navigation menu.
- Click Search.

Manage the available categories from this page.
- Click Add New Category to create a new saved super search category.
- Click the pencil icon next to an existing category to edit it.
- Click the trash can icon next to a category to delete it.
