
Steps to Create a GivingData App Registration in EntraID
⚠️This article is applicable for OneDrive, Document Linking and Outlook GivingData Integrations. It is rather technical and should be completed by whoever handles IT management for your organization (specifically, whoever handles the Azure setup related to GivingData). Initial setup only needs to be completed once per GivingData site (staging or production) that will be used with the integration.
Log into the Azure Portal (https://portal.azure.com) and navigate to Microsoft EntraID (formerly known as Azure Active Directory).

On the left-hand menu, select App Registrations > 'New registration'

Create the App Registration
In the Name field, enter a name for the application. Example: GivingData.Production > Select “Accounts in this organizational directory only”
**Redirect URI: Leave this field blank for now (it will be configured later in the Manifest).
Click Register

Once you click "Register", you should receive a toast notification confirming the apps registration and will be automatically taken to the new application that you just created.
**Copy the ApplicationID value on the Overview page as this information will be needed later. >Click Add an Application ID URI

Click the Add link next to Application ID URI at the top of the page > Accept the pre-populated Application ID URI value and click Save
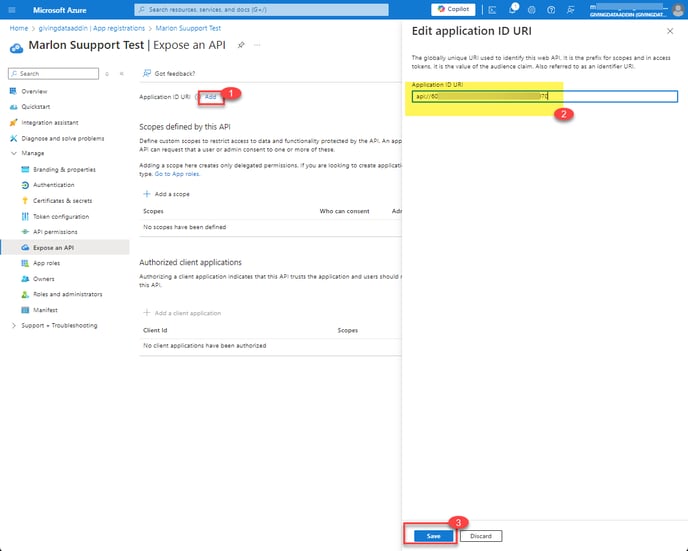
**Copy the entire value in the Application ID URI field and save as this will also be needed later.
Create and Configure Client Secrets
The Client Secret key in Entra ID is a confidential key generated during app registration. It securely authenticates your app when requesting tokens, ensuring only your app can access authorized API's and resources.
Click the Certificates & Secrets button in the menu
Under Client secrets, select New client secret. You can use any description, but set Expires to 24 months like in the example below:

**Copy the Client secret value. Store it securely, as you won’t be able to retrieve it later.

Set API Permissions
API Permissions determine what the GivingData app can access within Microsoft services. These permissions let the app perform tasks like reading emails or accessing files on behalf of the user. It's important to configure API permissions correctly to ensure the app only accesses what's necessary, keeping user data secure.
In the left-hand menu, click API permissions.
Click Add a permission, then select Microsoft Graph.

Under the Microsoft Graph permissions, select Application permissions add the following:
-
Files > Files.Read.All (Read files in all site collections)
-
Group > Group.Read.All (Read all groups)
-
Group > Group.ReadWrite.All (Read and write all groups)
-
Mail > Mail.Read (Read mail in all mailboxes) *required if using Outlook Add-In
After adding the permissions, click Grant admin consent at the top to apply these permissions.

Modify the Manifest
Enabling 'implicitGrantSettings' and 'redirectUris' (also referred to as reply URLs) in the Manifest allows the GivingData app to directly obtain tokens from the authorization endpoint without needing a server-side process.
Once a user logs in through Single Sign-On, they are authenticated with Microsoft. The GD app can then use the access token from that login to interact with Microsoft services, without requiring the user to re-authenticate for the Add-In.
In short, after logging in via SSO, the user doesn't need to sign in again to use the GivingData Add-In, as the app can act on their behalf using the existing token.
Click Manifest in the left-hand menu.
In the Manifest Editor, locate the "implicitGrantSettings"
- "enableAccessTokenIssuance"
- "enableIdTokenIssuance"
Set both keys to 'true' (like in the example below)

While still in the Manifest Editor, locate the redirectUris under the "spa" property and add the following entries -
"spa": { "redirectUris": ["https://*.givingdata.com/*","https://*.givingdata.com","https://<<clientsubdomain>>.givingdata.com/*","https://<<clientsubdomain>>.givingdata.com" ] }
Please replace <<clientsubdomain>> with the subdomain of your GivingData URL.

Click Save at the top of the page.
Click Authentication from the left menu options. Under “Implicit grant and hybrid flows”, ensure that the checkboxes for both Access tokens and ID tokens are both checked. If not, check both boxes and click Save.

Lastly, navigate to the Tenant Overview page > Properties and copy the TenantID to share with GivingData.

Provide Required Information to GivingData
Once all the configurations are complete, gather the following information:
- Application ID
- Application ID URI
- Tenant ID
- Client secret value
Share this information with your GivingData Project Manager or Technical Lead.
If you have any questions or concerns, please don't hesitate to contact our support team.