
Workflows are available with the Pro and Enterprise subscriptions.
The first step towards using workflows in your site is to build a workflow template. A workflow template is the combination of tasks and configurations that serve as steps in a workflow. Once a workflow template is built, it can be manually added to requests or configured to be automatically added to requests based on certain events.
Article Sections
Automatically Add a Workflow to Requests
Add a New Workflow Template
- Click the gear icon in the quick navigation menu.
- Click Workflows.

- Click Add New Workflow.

- Complete the applicable Add Workflow fields, and then click Save. Required fields are indicated by an asterisk.
- Workflow Name - Enter a name that captures the purpose of the workflow.
- Workflow Type - The selection in this field dictates the available triggers for automatically adding a workflow to a request, as well as the available task completed actions. Refer to the Workflow Types section for details.
- Description - Enter an optional description of the workflow’s purpose and any other details related to its use.
- Set Task Due Dates Based On - Due dates for tasks within the workflow can be set automatically. This field dictates which date is used as the basis for setting those due dates.
- For example, if Workflow Added Date is selected, the due date for each task can be configured based on a certain number of days before or after the date the workflow is added to a request.
- If this field is left blank, task due dates will not be set when the workflow is added to a request. Due dates can be configured manually.
- Automatically Add This Workflow to Requests - Configure rules to automatically add this workflow to requests based on a triggering event, such as the request status changing to a certain status. This is optional. Refer to the Automatically Add a Workflow to Requests section for details.

The new workflow template is now available in the Workflows list on the Workflows settings page.
- Click the caret to expand the details.

- Click the pencil icon to edit the workflow template properties.

- Click the trash can icon to delete the workflow template.

One or more tasks can now be added to build out the workflow steps.
Add a Workflow Task
- Follow the steps in the Add a New Workflow Template section to add a new workflow template, or navigate to an existing workflow template in the list.
- Click Add New Task to add the first task in the workflow.

- Complete the applicable Add Task fields, and then click Save. Required fields are indicated by an asterisk.
- Task Name - Enter a name that captures the purpose of the task.
- Due - Enter the number of days and select before or after the specified date to configure the due date for this task.
- Refer to the Add a New Workflow section for details on the Set Task Due Dates Base On field and make edits if needed.
- If no number of days is entered, no task due date will be automatically configured. It can be manually added later if needed.
- If the due date calculation falls on a Saturday, Sunday, or holiday (as configured in site settings), the due date is automatically adjusted to the next business day. Refer to Calendar Settings for details on configuring the observed holidays in your GivingData site.
-
- Description - Enter as much detail as necessary to describe the task. It is recommended to think through and write out each step the assigned user needs to take in order to complete this task.
- Subtasks - Enter up to 15 subtasks within this task. Subtasks can help organize work for a task that includes multiple steps. Subtasks do not have to be checked off in order for a task to be marked as complete.
- After adding a subtask, click it to make edits, or click the trash can icon to delete it.
- Drag and drop subtasks into the desired order.
- Visibility - Select the visibility of this task for users other than the assignee and followers.
- Public - Any user with the necessary permissions to open the task can view all activity and details and can make comments or edits.
- Private - Only the assignee and followers can view the task activity and details and make comments.
- Dependent On - If this task can only be completed after one or more other tasks are complete, select each of those tasks from this dropdown.
- A user assigned to the task cannot change its status until the tasks it is dependent on have been marked complete.
- Assigned - Select the specific user or role to be automatically assigned to this task.
- If the Primary Staff or Secondary Staff role is selected, the user with that role will be assigned to this task when the workflow is added to a request.
- If the User who Triggered this Workflow option is selected, the user who added the workflow to a request or took the action triggering the workflow to be automatically added to a request will be assigned to this task.
- If no user or role is selected, the assignee field will be blank when the workflow is added to a request. An assignee can be added manually at a later time.
- Followers - Select one or more users or roles to be automatically added as followers to this task.
- If the Primary Staff or Secondary Staff role is selected, the user with that role will be added as a follower of this task when the workflow is added to a request. Selecting Request Followers automatically adds followers of the request as followers of this task.
- If the User who Triggered this Workflow option is selected, the user who added the workflow to a request or took the action triggering the workflow to be automatically added to a request will be added as a follower of this task.
- If nothing is selected, no follower will be automatically added. The followers can be added manually at a later time.
- Add Task Completed Action - Configure an action to be prompted when this task is marked complete. This is optional. Refer to the Add Task Completed Actions section for details.

Add as many additional tasks as needed to the workflow. Drag and drop tasks to reorder them within the workflow.
- This task order is a visual tool. Task due dates must be changed by editing each task.
- If dependencies have been set, a task cannot be moved above a task upon which it depends.
- Once a workflow template is added to a request, the task order can be edited for that specific request if needed.

Each user can configure their own notification settings related to workflow tasks. Managing GivingData Notification Settings contains details and offers a recommended configuration of notification settings for users with access to workflows.
Workflow Types
The selected workflow type dictates the available triggers (rules) for automatically adding the workflow to requests, as well as the available task completed actions. When choosing the workflow type, it is recommended to think through what event starts the workflow and what actions should be prompted as workflow tasks are completed.
The chart below displays the available task completed actions based on workflow type.
The Learning & Evaluation workflow type is only available with the outcome tracking and learning feature, which is available as an add-on to all subscriptions.

For each workflow type, below are the available rules for triggering a workflow to be added automatically to a request. Refer to the Automatically Add a Workflow to Requests section for details on adding rules and criteria.
- Request Workflow - Rules based on request status changing.
- Payment Workflow - Rules based on payment status changing
- Requirement Workflow - Rules based on the Requirement Completed field changing to Yes or No.
- Learning Workflow - N/A
- Grant Amendment Workflow - Rules based on amendment status changing.
- Unsolicited Application Workflow - N/A
- Invited Application Workflow - Rules based on intake entry status changing.
- Active Grant Intake Form Workflow - Rules based on intake entry status changing.
- Grantee Report Workflow - Rules based on intake entry status changing.
- Grantee Submission Workflow - Rules based on intake entry status changing.
Criteria can then be added to refine each rule. Any fields available as filters in a super search for the record or item type can be added as criteria.
The grant amendment workflow type is an exception, as grant amendment fields are not available in super search at this time. The following fields are available as criteria for a grant amendment workflow:
- Grant Amendment ID
- Source Id
- Approval Date
- Notes
- Amendment Type
- Status
- Create Date
- Last Updated Date
- Created By
- Last Updated By
Automatically Add a Workflow to Requests
While workflows can be added to requests manually, rules can also be configured to automatically add a workflow to requests. These rules describe a trigger event, such as the request status changing to a specific status. Criteria can be added to refine each rule. See the Workflow Types section for details on which rules are available based on the selected workflow type.
- Follow the steps in the Add a New Workflow Template section to add a new workflow template, or click the pencil icon next to an existing workflow template to edit it.
- Click Automatically Add This Workflow to Requests.

- Click Add Another Rule.

- Select an option from the dropdown to configure the rule for automatically adding this workflow to a request.

- Click Add New Criteria, and then select options from the dropdowns to configure criteria to check before adding the workflow based on the rule. If a request meets the criteria, the workflow will be added to the request when the trigger described by the rule occurs.

- Click Add New Criteria again to configure additional criteria. Up to 3 criteria can be configured per rule.

- The operator can be changed from And to Or in between the criteria. The same operator applies in between all criteria for the rule.

- The operator can be changed from And to Or in between the criteria. The same operator applies in between all criteria for the rule.
- Click Add New Criteria again to configure additional criteria. Up to 3 criteria can be configured per rule.
- Click Add Another Rule to add an additional rule if needed.
- If multiple rules are added, they are combined with the OR operator, meaning the workflow will automatically be added if any of the rules are true.

- If multiple rules are added, they are combined with the OR operator, meaning the workflow will automatically be added if any of the rules are true.
- Click Save.

The workflow will now automatically be added to requests when any of the trigger events occur as described by the rules and their criteria.
- In the example below, the workflow will automatically be added to requests when the request status changes to Invited, if the transaction type is equal to cash grant and the recommended amount is greater than $50,000.

Automatically Create Documents From Templates
A document or super doc can be automatically created from a template when a workflow task is added and/or completed. For example, this can be used to automatically create award letters or staff review documents as part of a workflow task. Created documents are added to the applicable record's Documents tab and are linked to the workflow task.
Organization, request, payment, and requirement document templates can be selected depending upon the workflow type.
- Follow the steps in the Add a Workflow Task section to add a new workflow task, or click the pencil icon next to an existing workflow task to edit it.
- Select one or more templates from the When this task is added and/or When this task is completed dropdowns.

- Click Save.

Add Task Completed Actions
For each task within a workflow, an action can be prompted when a user completes the task. See the Workflow Types section for details on which actions are available to prompt based on the selected workflow type. When a user marks the task complete, a modal appears, asking the user if they would like to take the suggested action.
In the example below, the task was configured to prompt the action of changing the request status. After the user marked the task complete, the modal below appeared to prompt the user to take the action of changing the request status.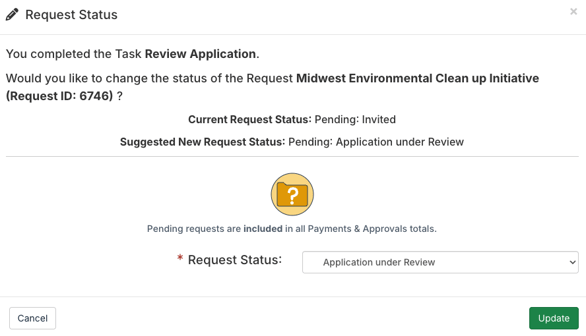
Follow the steps below to configure a task completed action for a workflow task.
- Follow the steps in the Add a Workflow Task section to add a new workflow task, or click the pencil icon next to an existing workflow task to edit it.
- Select an action from the dropdown.

- Based on the action selected, an additional dropdown may appear. Select the appropriate option from the dropdown.
- For example, if the action is changing the request status, the request status to be selected by default is configured in the next dropdown. When completing this task, the user can select a different status if desired.

- For example, if the action is changing the request status, the request status to be selected by default is configured in the next dropdown. When completing this task, the user can select a different status if desired.
- Click Save.

A user completing this task will now be prompted to complete the configured action.