Essential IT Setup for GivingData Outlook Add-In
Before users can install and utilize the GivingData Outlook Add-In, the users IT must complete several key configuration steps in Azure's EntraID
The setup portion of this guide should be completed by whoever handles IT management for your organization (specifically, whoever handles the Azure setup related to GivingData). Initial setup only needs to be completed once per Foundation (staging or production) that will be using the Outlook Add-In.
Check for an Existing Configuration
Before proceeding with the Outlook Add-In integration, verify if an Application Registration already exists in Azure's Entra ID. Clients using the OneDrive Integration may have already created an app registration, and can reuse the Application ID, Client Secret, and Tenant Domain.
If an App Registration has not been created please refer to these steps on how to Create a GivingData App Registration (Azure).
Setup Overview
Before installing the Add-In for end users locally, IT should obtain the Application ID, update the Manifest, enable Authentication Flow, add API Permissions, create/configure Client Secrets
and retrieve the Tenant Domain. The following steps outline how to do this.
Obtaining the Application ID
An app registration is the identity and configuration for your application in EntraID. This registration allows the app to integrate with Microsoft services, enabling it to authenticate users and access resources.
To access it, log into https://portal.azure.com > Microsoft EntraID > Select the App Registration created for GivingData.
You will see the Application ID listed in the Overview tab.

GivingData requires the ApplicationID to complete the set up. Copy and save for later.
Modify the Manifest
Enabling 'implicitGrantSettings' and 'redirectUris' in the Manifest allows the GivingData app to obtain tokens directly from the authorization endpoint, eliminating the need for a server-side process. This enables users to access the Add-In without the need for re-authentication after logging in via Single Sign-On.
From within the EntraID App registration, click Manifest in the left-hand menu.
In the Manifest Editor, locate the "implicitGrantSettings"
- "enableAccessTokenIssuance"
- "enableIdTokenIssuance"
Set both keys to 'true' (like in the example below)

While still in the Manifest Editor, locate the redirectUris under the "spa" property and add the following entries, (replacing placeholders with your subdomain information):
"spa": { "redirectUris": ["https://*.givingdata.com/*","https://*.givingdata.com","https://<<clientsubdomain>>.givingdata.com/*","https://<<clientsubdomain>>.givingdata.com" ] }
Please replace <<clientsubdomain>> with the subdomain of your GivingData URL. (ex. https://test.givingdata.com)

Click Save at the top of the page.
Authentication Flow
Click Authentication from the left menu options. Under “Implicit grant and hybrid flows”, ensure that the checkboxes for both Access tokens and ID tokens are both checked. If not, check both boxes and click Save.

Set Microsoft Graph API Permissions
Microsoft's Graph API permissions determine what the GivingData app can access within Microsoft services. These permissions let the app perform tasks like reading emails or accessing files on behalf of the user. It's important to configure Microsoft Graph API permissions correctly to ensure the app only accesses what's necessary, keeping user data secure.
In the left-hand menu, click API permissions.
Click Add a permission, then select Microsoft Graph.

Under the Microsoft Graph permissions, select Application permissions add the following:
-
Mail > Mail.Read (Read mail in all mailboxes)
After adding the permission, click Grant admin consent at the top to apply these permissions.

Create and Configure Client Secrets
The Client Secret key in Entra ID is a confidential key generated during app registration. It securely authenticates your app when requesting tokens, ensuring only your app can access authorized API's and resources.
Click the Certificates & Secrets button in the menu
Under Client secrets, select New client secret. You can use any description, but set Expires to 24 months like in the example below:

Copy the Client secret value as shown below. Store it securely, as you won’t be able to retrieve it later

Tenant Domain Name
The Tenant or Primary domain name in Microsoft Entra ID is the unique domain associated with your organization's directory. It is used to identify your organization's resources and users within the Microsoft cloud environment.
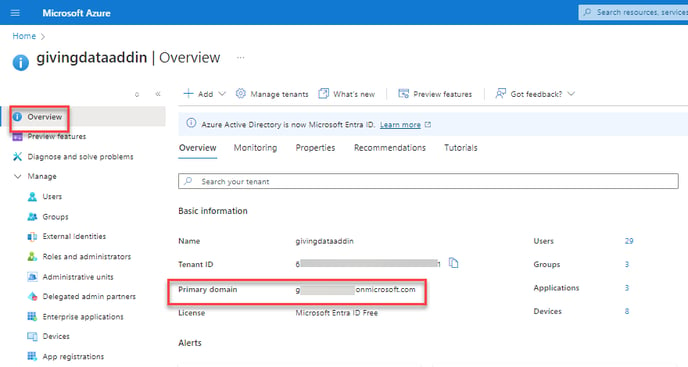
Go to the Overview page in the Microsoft Entra ID, you will see your Tenant Information.
Primary domain or Tenant domain will be listed under the Basic information section.

Copy and save the Domain Name as GivingData also requires it to complete the set up.
Provide Required Information to GivingData
Once all the configurations are complete in EntraID, gather the following information:
- Application ID
- Client secret value
- Tenant Domain name
Share this information with your GivingData Project Manager or Technical Lead.
If you have any questions or concerns, please don't hesitate to contact our support team.
