Requests
Add a new request record and manage request settings.
Add a new request record to your site, view and manage its information in the request record tabs, and configure settings for request records.
A request record houses grantee portal intake forms for the request, such as application and report forms. The details of adding these forms to a request vary depending upon the type of form. Refer to the articles below for details.
Add a Request
- Navigate to the relevant organization record.
- Click the Requests tab.
- Click Add New Request.

- Complete the applicable fields, and then click Save.
- Request Title - Enter a descriptive title for the request.
- Transaction Type - Select the transaction type for the request.
- The Request Settings section contains details on configuring the available transaction types.
- Status - Select the current status for the request.
- The Request Settings section contains details on configuring the available statuses.
- New requests can only be created in a status within the Exploring, Planning, or Pending dispositions.
- If the new request is created in a status within the Planning disposition, a payment record is automatically created for the request. If the new request is created in a status within the Pending disposition, no payment record is automatically created.
- Primary Staff - Select the primary staff member assigned to this request.
- By default, primary staff receive notifications about their assigned requests, such as when requests are approved or declined. Users can manage their notification settings.
- Secondary Staff - Optionally select a secondary staff member assigned to this request.
- By default, secondary staff receive notifications about their assigned requests, such as when requests are approved or declined. Users can manage their notification settings.
- Meeting Date - Optionally enter the date of the board meeting at which this request will be considered, or the anticipated date on which this request would be approved.
- If left blank, this field automatically populates with the last day of the fiscal year.
- By default, this field populates the Anticipated Approval date on the request record. If a different date field is configured to do so, that field appears here instead of the Meeting Date field. Refer to Manage Requests for details.
- Recommended Amount - Enter the recommended amount for the request.
- Once the request is created, a field for the Requested Amount is also available on the Overview tab.
- Contact your CSM if you prefer to have the Requested Amount field appear in the modal when adding a request instead of the Recommended Amount.
- The Recommended Amount field is not visible in the grantee portal unless it is added to an intake form as a mapped field displaying the current value. Build a Grantee Portal Intake Form contains details on mapped fields.

A request can also be added from the quick navigation menu.
- Click the plus icon in the quick navigation menu.
- Click Request.

- Complete the applicable fields, and then click Save.
- Organization - Search for and select the organization or click the plus icon to add a new organization to the site.

- Organization - Search for and select the organization or click the plus icon to add a new organization to the site.
A request can also be added from the scenario planning view of a dashboard. This is often done to add requests in the Exploring disposition when considering the potential impact on budgets.
Request Record Tabs
Once a request record is added, multiple tabs are available on the record containing information and other functionalities.
Overview
Actions can be taken on this tab to manage the request, such as changing the request status or approving or declining it. Fields and visuals are also available, providing summarized and key information related to the request. Some of these items include:
- A required request fields checklist, if configured.

- The request primary contact, with the ability to make edits.

- Fields related to the request amounts, such as the Requested Amount and Recommended Amount.

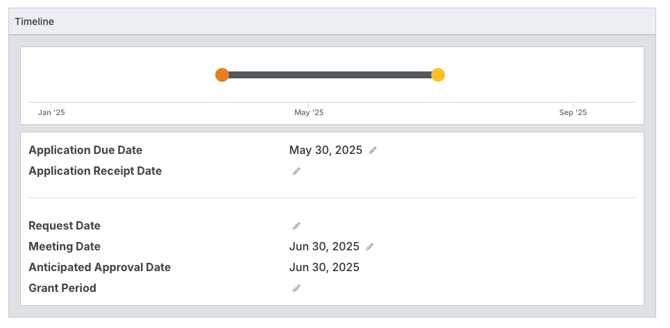
- A visual timeline for key request dates and fields for key dates, such as the Application Due Date and Grant Period.
- If no invited application intake forms are added to the request, the Application Due Date and Application Receipt Date fields can be edited directly. If an invited application intake form is added, its due date and receipt date override manual entries in these fields.
- If multiple invited application intake forms are added, the option is given when adding the additional forms to choose which form populates these fields.
- If multiple invited application intake forms are added, the option is given when adding the additional forms to choose which form populates these fields.
- If no invited application intake forms are added to the request, the Application Due Date and Application Receipt Date fields can be edited directly. If an invited application intake form is added, its due date and receipt date override manual entries in these fields.
- Any existing request alerts, with the ability to add alerts.
- The Request Settings section contains details on configuring the available alert types.

- The Request Settings section contains details on configuring the available alert types.
Workflows
If included with your GivingData subscription, workflows for the request can be added and managed on this tab. Manage Workflows and Workflow Tasks contains details.
Payments & Budget
Access and manage payments for the request on this tab, and view summarized payment information. Payments contains details on adding a new payment record.
- Click the double arrow icon to access a payment record.

- Click the trash can icon to delete a payment record.

The project budget can also be tracked on this tab. This data can also be imported from mapped fields on a grantee portal intake form.
- Click Track Project Budget and Requested Amount By Year to enter detailed project budget information.

- After adding the applicable overall budget information for a year, Click Manage Notable Sources of Revenue or Expenses to add or manage specific revenue or expense items.
- See the Request Settings section for details on configuring the available revenue and expense items.

- See the Request Settings section for details on configuring the available revenue and expense items.
- After adding the applicable overall budget information for a year, Click Manage Notable Sources of Revenue or Expenses to add or manage specific revenue or expense items.
Requirements
Add a new requirement for the request from this tab, and view the existing request and payment requirements.
- Click Add New Requirement to add a new request or payment requirement.

- Click the double arrow icon to open a request requirement.

- Click the trash can icon to delete a requirement.

Documents
Access and manage request documents on this tab. These are documents related specifically to the request, and they can be added manually or imported from grantee portal intake forms.
- Click Add New Document to add a new request document.
- Multiple options are available, including uploading a document from your computer or utilizing a document template or super doc template.

- Multiple options are available, including uploading a document from your computer or utilizing a document template or super doc template.
- Click a document title to view the document.

- Click the double arrow icon to manage the document properties.

- Click the dropdown icon to access options such as editing document properties, uploading a new version, downloading the document, or other options depending upon the type of document.

- Click the trash can icon to delete a document.

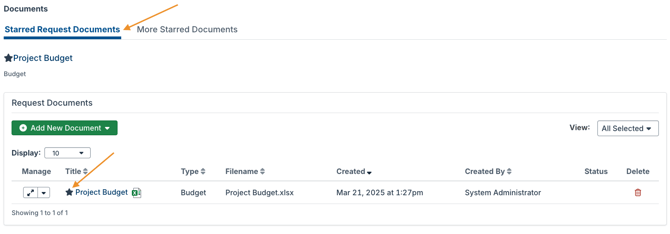
- The Starred Request Documents tab gives easy access to any request documents that have the star icon selected. The More Starred Documents tab gives easy access to other documents related to the request (e.g. requirement documents, payment documents) that have the star icon selected.
- The star icon for a document can be selected or unselected in the document list.
- The star icon for a document can be selected or unselected in the document list.
Tags & Coding
Manage the tags and codes applied to this request record in this tab. Tags Versus Codes contains details on adding tags, and Codes Overview contains details on the use of codes in the site.
Contacts
Contacts related to the request are listed in this tab and additional contacts can be added. Refer to Manage Contacts for details on adding new contacts and managing existing contacts. 
Interactions
Interactions related to the request can be viewed and added here. Interactions added to any requirements or payments for the request are also visible here. Interactions contains details on adding and managing interactions in the site.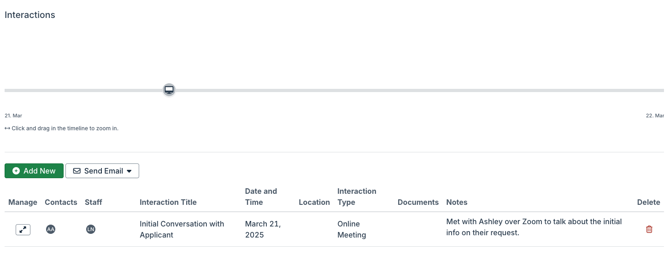
Publishing
If added to your GivingData subscription, fields related to the web publishing API can be accessed on this tab. API Documentation contains details.
Monitoring & Assessment
If added to your GivingData subscription, fields related to the outcome tracking and learning feature can be accessed on this tab. Contact your CSM for details on this feature.
Grantee Portal
Grantee portal intake forms and assigned grantee portal users can be added and managed for the request on this tab. Grantee Portal Overview contains details on the available types of intake forms.
If applicable, it is recommended to add one or more default assigned grantee portal users for the request. When an invited application, report, or grantee submission intake form is added to the request, these users are automatically assigned to the form. This is especially helpful if requirements with a report or submission intake form will be batch added for requests. If default grantee portal users are not configured, they will need to be manually assigned for each request.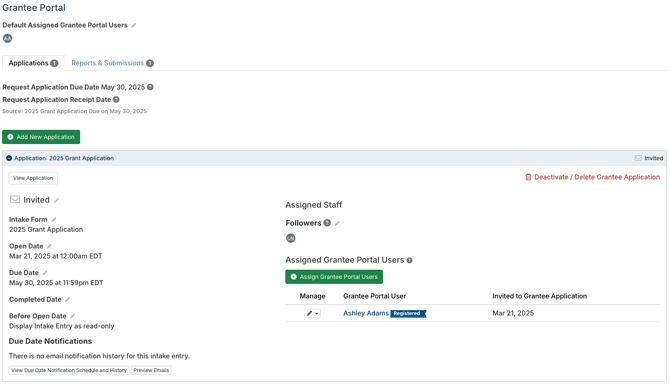
Custom Fields
Any request custom fields that have been configured in the site can be viewed and edited for the request record here. The title of this tab can be customized. Custom Fields Overview contains details on managing the available custom fields for the site.
Request Settings
Settings and configurations for request records can be managed in Admin Tools & Settings.
- Click the gear icon in the quick navigation menu.
- Click Requests.

- Click a dropdown to configure the related settings. Details are available in each section below.
Request Statuses
Manage the request statuses available to assign to request records within each disposition. Request Dispositions and Statuses contains information about each disposition and commonly added statuses within each.
- Click Add New Status to add a new status.

- The Insert After Disposition/Status dropdown determines which disposition this status should be added within, and where it should appear in the list of statuses. This list order is also reflected when selecting a status on a request record.
- The selected color is used for the status on dashboards.

- Existing statuses can be edited or made active/inactive using the pencil icon, deleted using the trash can icon, and dragged and dropped into a different order within the disposition.
- For statuses in the Approved disposition, the Active/Closed selection is related to various functionalities in the site.
- The selection of an approved status with active or closed configured affects where an approved request displays in the grantee portal, if applicable.
- Triggers can be configured related to selecting an approved closed status, as described in the Closed Grant Settings section below.

Declination Reasons
Manage the available declination reasons to select when declining a request record.
- Click Add New Declination Reason to add a new reason.

- Existing reasons can be edited using the pencil icon, deleted using the trash can icon, and dragged and dropped into a different order.
Alert Types
Manage the available alert types to add on request records.
- Click Add New Alert Types to add a new type.

- Existing alert types can be edited using the pencil icon, deleted using the trash can icon, and dragged and dropped into a different order.
Closed Grant Settings
Manage settings related to changing a request’s status to an approved closed status. These are statuses within the Approved disposition with Closed selected in the Active/Closed dropdown. For each trigger, there is the option to not allow requests to have their status changed to an approved closed status until the trigger is resolved. There is also the option to display a warning but allow the status to be changed.
- Click the pencil icon next to a trigger, and then select an option in the Result dropdown.

- If No is selected in the Allow grants with warnings to be closed in Batch Edits field, requests cannot have their status changed to an approved closed status in batch if warnings display based on any triggers.

Transaction Types
Manage the available transaction types to select when adding a request record. These classify the type of grant (e.g. cash grant, matching gift, etc.) and can be used in a super search, to trigger workflows to be automatically added to requests, and can be used in conjunction with default coding, as described below.
- Click Add New Transaction Type to add a new type.

- Select any additional field sets that should populate on a request record if this transaction type is selected. If available with your subscription, reach out to your CSM to discuss the Matching Gifts and/or Direct Charitable Activities features and additional fields sets.
- The Insert After Transaction Type dropdown determines where this type should be added in the list of existing types. This list order is also reflected when selecting a transaction type on a request record.
- Check the box for Default to set this as the default transaction type when adding a new request record.
- Check the box for Exclude Requests from Disposition Lists on Organization detail if requests with this transaction type should be excluded from the request disposition totals shown on the Overview tab of organization records.

- Existing types can be edited or made active/inactive using the pencil icon, deleted using the trash can icon, and dragged and dropped into a different order.
Default Coding
Manage any default coding for requests. If a default code is configured for a transaction type, it will be applied automatically when adding a request record with that transaction type. The code selection can then be changed on the request record, but this can save time if a certain code will be selected the majority of the time.
- Click the pencil icon next to a transaction type, click Add New Code, and then select the code type to add a new default. Only codes assignable to requests are available to select.

- Check the box for the default code to be selected when adding request record.

- Check the box for the default code to be selected when adding request record.
- Existing defaults can be edited using the pencil icon.
- To delete a default, leave all boxes unchecked when editing it.

- To delete a default, leave all boxes unchecked when editing it.
Matching Gifts
The ability to track matching gifts is available with the Pro and Enterprise subscriptions.
If a matching gifts transaction type is configured with the additional matching fields set selected, settings related to those additional matching fields can be configured here. Reach out to your CSM to discuss these settings and the ability to track matching gifts in the site.
Budget Management
The ability to collect Project Budget fields on a grantee portal intake form is available with the Pro and Enterprise subscriptions.
Manage the revenue and expense items to track for request project budgets. These configurations apply both when adding project budget data on a request record, and when collecting financial data through Project Budget fields on a grantee portal intake form.
- Click Revenue or Expenses to manage the items for either category.

- Click a budget item to access the existing list of budget items categorized directly beneath it. In the example below, Contributed Revenue and Earned Revenue are categorized directly beneath the overall Revenue category.
- Items in this second level below Revenue or Expenses can be viewed on the Payments & Budget tab on request records without an additional click to view details.
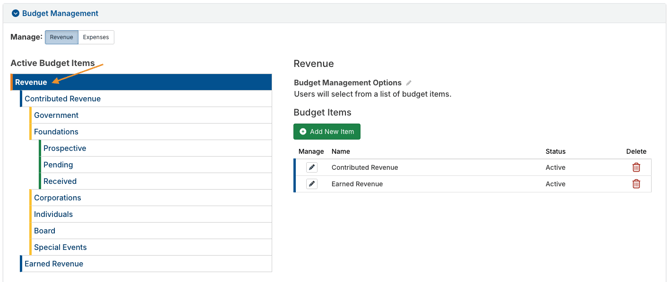
- Items in this second level below Revenue or Expenses can be viewed on the Payments & Budget tab on request records without an additional click to view details.
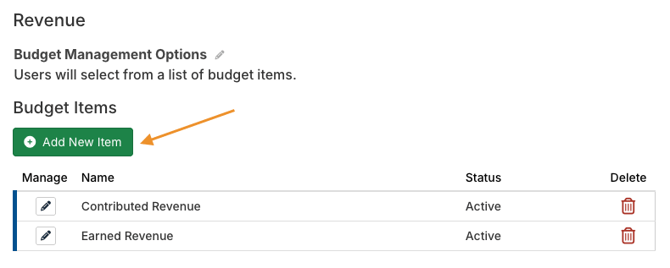
- Within each budget items list, click Add New Item to add a new item.
- Existing items can be edited or made active/inactive using the pencil icon or deleted using the trash can icon.
- The Budget Management Options field determines whether users can enter a custom budget item at this level of the budget, or if they can only use the configured items. This is applicable both when entering data on a request record and when collecting financial data through Project Budget fields on a grantee portal intake form.
- Click the pencil icon next to Revenue Budget Items Label or Expense Budget Items Label to edit the label for the section of revenue or expense items within the project budget field on a grantee portal intake form.

- Click the pencil icon next to Revenue Budget Items Help Text or Expense Budget Items Help Text to edit the help text for the section of revenue or expense items within the project budget field on a grantee portal intake form.

Renewals
Manage settings related to renewal requests. Grant Renewals contains details about creating and managing renewal requests.
- Click the pencil icon next to Default Renewal Data, and then check the box for each field of data to automatically copy from an original grant into a new renewal request record.
- Only certain fields are available, and additional fields cannot be added to the list.

- Click the pencil icon next to Default Renewal Date to configure the default date to populate in the Renewal Notification Date field when scheduling a reminder to create a renewal request. This date can be edited as needed.

- Click the pencil icon next to Scenario Planning Upcoming Renewal Date to edit it. Grants appear in a list on scenario planning in payment and approval dashboards a certain number of days before their renewal notification date. This field dictates the number of days.

Internal Approval
If the internal approval feature is enabled in your site, the internal approval rules and default settings can be configured here. Reach out to your CSM to discuss these rules and settings or to enable this feature in your site.
